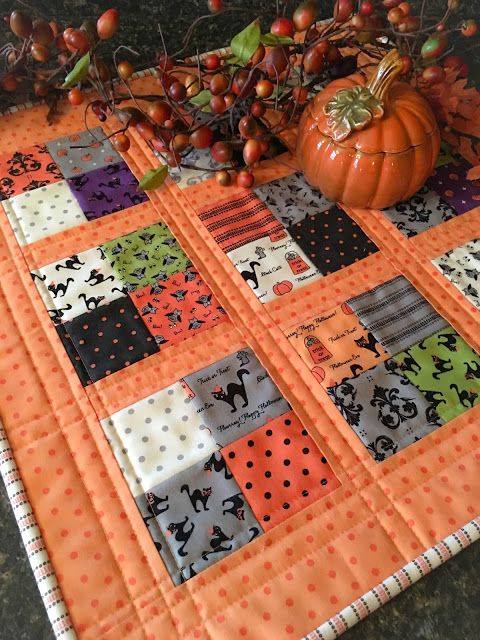
Halloween Quilt

Finished size: 18 ½” x 18 ½”
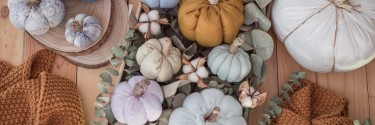
Decorate your halloween parties with a lovely themed tablecloths.
Visit our halloween fabrics section to inspire or create your own designs and stamps on fabric.
It's a very quick and easy project. In fact, it is likely that you can chop, quilt and sew everything in one day!
The finished quilt measures 50x50cm so it is a good size to place a plate of cookies to serve with coffee or a plate of Halloween treats, but you can make it as big as you want.
The little ones will love it!
Step 1: Collect all the goodies:
(36) 2 ½” squares
1/4 yard sashing fabric, sub cut as follows:
Cut 2 strips 1 ½” x WOF.
Sub cut into (6) 1 ½” x 4 ½” strips and (2) 1 ½” x 14 ½” strips.
Cut 2 strips 2 ½” x WOF.
Sub cut into (2) 2 ½” x 14 ½” strips and (2) 2 ½” x 18 ½” strips.
1/6 yard binding fabric, sub cut as follows:
Cut 2 strips 2 ¼” wide and piece together for binding.
26 ½” x 26 ½” backing piece (or as required per your quilter)
2 yards of decorative trim (crocheted trim, lace, ribbon)
buttons
Note: WOF (Width of Fabric); RST (Right Sides Together)
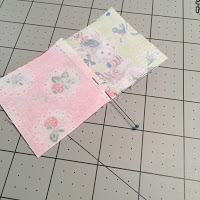
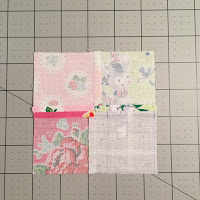
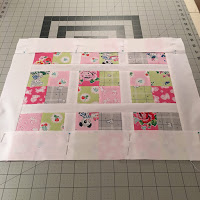
Step 2: Create the Four-Patch Squares
Lay out the (36) 2 ½” squares into (9) four-patch squares so that you have a nice mix of color and patterns.
Sew each group into a four patch. First sew the top two squares together and press to one direction. Then sew the bottom two squares together and press to the other direction.
Nest the seams and sew these two units together. Press this horizontal seam open. Repeat to create 9 four patches. Each four patch should measure 4 1/2" x 4 1/2".
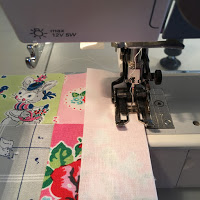
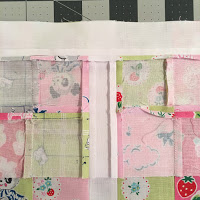
Step 3: Add the sashing
Lay out the four patches and vertical sashing. Sew each row together working from left to right. Press seams toward the sashing.
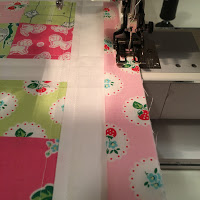
Lay out the completed rows and the horizontal sashing. Sew these units together, moving from top to bottom. Press seams toward the sashing. Note: When I placed one row RST on top of another row, I pulled the top unit back a bit to take a look and make sure the vertical sashings were lined up. (see image below)
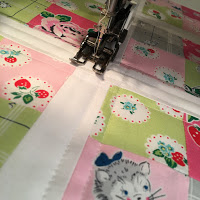
Step 4: Add the borders
Sew the 2 1/2" x 14 1/2" border to the top and bottom of the quilt. Press to the border.
Sew the 2 1/2" x 18 1/2" border to the left and right of the quilt. Press to the border.
Step 5: Quilt as desired
Layer your quilt top, batting, and backing using your preferred method of pinning, thread or spray basting. Since this is such a small piece, I found that fabric adhesive was enough to keep my quilt in place and flat during quilting. I kept my quilting simple, using a pleasing grid design and allowing the fabric to be the star of the show. When you have finished the quilting, trim the backing and batting.
Step 6: Binding
The next step is to bind your quilt as desired. I used 2 ¼” strips for my binding. My preferred method is to machine bind to the top, and hand stitch the binding to the back to finish.
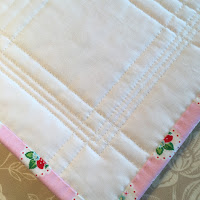
Step 7: Embellish with trim and buttons
NOTE: Typically the final step is to bind the quilt, but I chose to add the embellishments after binding since I was using a more delicate, vintage trim.
The methods for attaching any kind of trim (crochet work, lace, ribbon) may need to vary depending on the design and condition of the trim. If it is very delicate or intricate, you may need to attach by hand.
I used a spray adhesive on the back of my trim pieces to temporarily adhere them to the top of the quilt. I use 505 Spray Adhesive, which is acid free and temporary. This adhesive is sticky enough to hold the trim in place, but it also allows you to pick up a piece to reposition it.
When I got to the corners, I simply turned the trim as best I could and did a bit of tucking. My pink and white trim came in two pieces, so unfortunately I had to match two seams. I put the seams on the corners as I knew I would also be attaching vintage buttons.
After I had the trim lying flat and looking nice, I sewed it in place using matching thread and my walking foot. I sewed very slowly to ensure that the trim did not get caught and bunch up.
Related posts
New post

DIY Christmas Reindeer With Plaid Fabric
New post

DIY Gnomos De Navidad - Manualidades con Tela - Christmas Gnomes Tutorial
Calabazas de tela sin coser DIY

Sewing Tutorial - Laptop Sleeve

How To Make A Rapport - Design Your Fabrics With Printing Fabrics

Make your Fabrics come true with Printing Fabrics!

“Una buena mascarilla textil protege, es más sostenible y ayuda a la economía local”