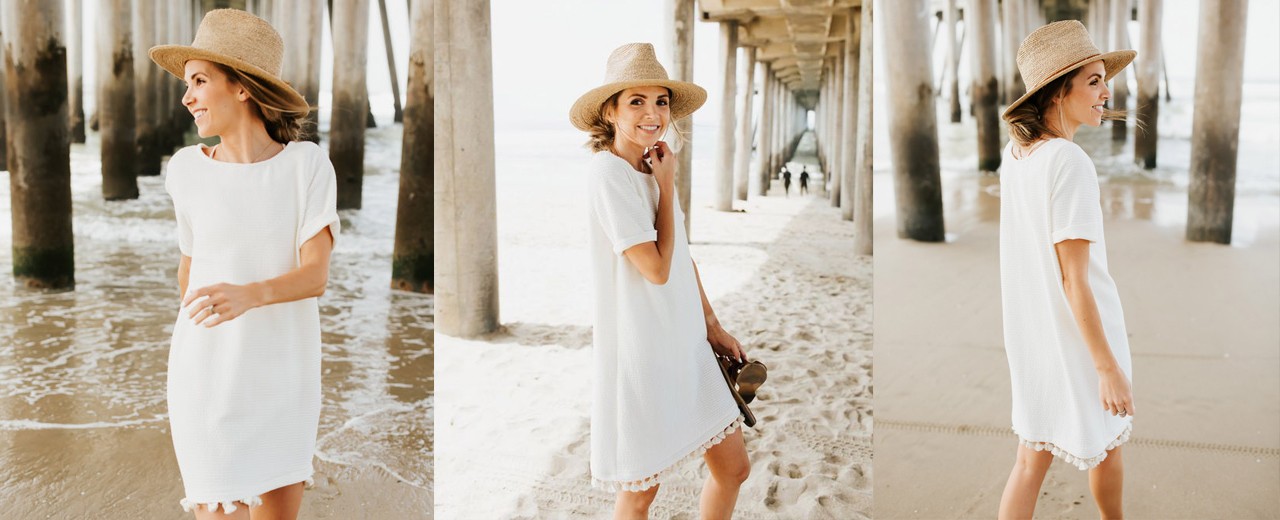
Summer Dress
Merric's Art Tutorial
I’m so excited to be back today with a beginner sewing tutorial! April completely slipped away from me and I didn’t get any sewing done the entire month.
Here’s What You’ll Need:
1 1/2 – 2 yards medium weight stretchy fabric (I picked this one up at JoAnn’s)
1 1/2 – 2 yards tassel trim (also found at JoAnn’s in their trim aisle).
Matching thread
learn how to make this easy coverup for beach or pool days!
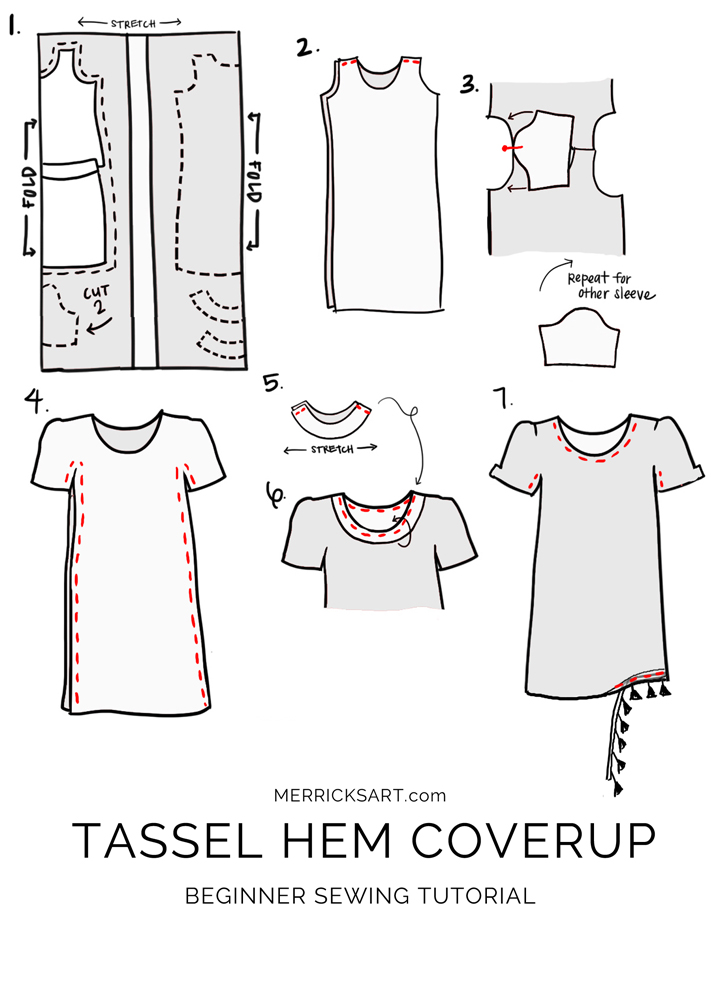
First up, you’ll need to make a pattern. I have a video right HERE showing how to do. You’ll just need to use a t-shirt or a tank top and follow that to make a really simple shift dress shape. You’ll also need sleeves (make them a little bit loose and around elbow length), and then neckline lining pieces (just make them identical to your dress neckline, and about 2-3 inches thick). Reference the illustration for approximate shapes.
Once you make your pattern, use those pattern pieces to cut out your fabric pieces. You’ll need a DRESS FRONT and DRESS BACK (make sure the neckline opening is big enough to fit your head through), two SLEEVE pieces, and a NECKLINE FRONT and NECKLINE BACK.
Now it’s time to sew!
Step 1. Take your DRESS FRONT and DRESS BACK and sew them together at the shoulder seams with right sides of the fabric together. You can serge or zigzag the seam allowances if you’d like, but a stretchy knit won’t fray, so it’s not necessary.
Step 2. Cut off 1″ of each side of your neckline lining pieces, as shown. You’ll want it slightly smaller than your dress neckline so your neckline doesn’t get wavy when we sew them together. Take your NECKLINE FRONT and NECKLINE BACK and sew them together at the shoulders too (with right sides of the fabric together).
Step 3. Time for sleeves. Lay your dress on a flat surface, opening it up so the BACK and FRONT are laid out flat in opposite directions. Take one of your SLEEVE pieces and pin it to the arm opening, starting at the top of the curve and working your way down each side.
Now sew up and over the curve with a straight stitch. Repeat for the second sleeve.
Step 4. Let’s sew up the dress now. With right sides of the fabric together, pin the dress down the sleeve, across the armpit, and down the dress. Then sew with a straight stitch down each side.
Step 5. With right sides of the fabric together, pin the NECKLINE LINING (which should be an “O” shape) to the neckline of the DRESS. Since the lining is slightly smaller, stretch it evenly around the dress neckline, and then you’ll need to stretch it as you sew so it lays flat. Now sew around the entire neckline with a straight stitch.
Step 6. Tuck the neckline lining inside the dress, press into place with your iron, pin around the entire neckline to keep it flat, and then sew with a wide straight stitch around the entire dress neckline. Now your neckline is done!
Step 7. Now for the easy part. Cut the hem to your desired length, fold the bottom edge under about 1″, and pin it in place all the way around the hem of the dress. Now take your tassel trim and pin it to the inside of the hem just so the tassels stick out the bottom. Pin it all the way around the dress, and then do a wide straight stitch around the entire hem to sew the hem in place and the trim in place.
Now press all your seams flat, and you’re done!!

Related posts

New post

DIY Christmas Reindeer With Plaid Fabric
New post

DIY Gnomos De Navidad - Manualidades con Tela - Christmas Gnomes Tutorial

Calabazas de tela sin coser DIY

Sewing Tutorial - Laptop Sleeve

How To Make A Rapport - Design Your Fabrics With Printing Fabrics

Make your Fabrics come true with Printing Fabrics!

“Una buena mascarilla textil protege, es más sostenible y ayuda a la economía local”